{0><}0{>Configuración del módulo Inventario electrónico Birch Street<0}
-
{0><}0{>UBICACIONES DEL INVENTARIO<0}
-
{0><}0{>Cargue la pantalla de Ubicación. En la ficha Primera página, deseleccione la casilla de verificación Esconder menú en el panel del LOGOTIPO para mostrar el Menú principal.<0} {0><}0{>En Comercio - > Administración de la Compañía seleccione la pantalla Ubicación.<0}
-
{0><}0{>En la pantalla Ubicación, primero asegúrese de que la ubicación que usted desea crear no existe, verificando la lista de ubicaciones en la Lista de desplazamiento a la izquierda de la pantalla.<0}
-
{0><}0{>Si la ubicación de Inventario no existe, cree un nuevo registro de ubicación con un tipo de Ubicación = Depósito.<0} {0><}0{>Ingrese los datos solicitados y haga clic en Guardar.<0} {0><}0{>Repita este paso para todas las ubicaciones de inventario deseadas y haga clic en Cerrar para volver a las fichas Primera página. <0}{0><}100{>NOTA:<0} {0><}0{>NO modifique la ID de ubicación en 0. El campo ID de ubicación estará previamente llenado cuando se guarde el registro por primera vez.<0}
-
{0><}67{>GUÍAS DE ORDEN DE INVENTARIO<0}
-
{0><}0{>Crear una nueva Guía de orden de inventario<0}
-
{0><}0{>En la ficha Guía de orden, haga clic en Crear guía de orden.<0}
-
{0><}0{>Ingrese el nombre de la GO de inventario, haga clic en la casilla de verificación GO de inventario y seleccione la Ubicación de depósito creada en el paso 1.1. Haga clic en OK.<0}
{0><}100{>Nota:<0} {0><}0{>para que la Guía de orden de inventario esté disponible para otros usuarios (GO compartida), asegúrese de que el nombre esté precedido por un asterisco (*).<0} -
{0><}0{>Haga clic en OK en el mensaje emergente que indica que la nueva Guía de orden fue creada.<0}
-
{0><}0{>Se muestra la nueva Guía de orden de inventario. <0} {0><}0{>Observe que el nombre de la Guía de orden de inventario tiene un anexo “_IV” (Campo de golf_IV) y el nombre de la ubicación del depósito aparece en rojo.<0} {0><}0{>Estos son indicadores visuales que informan que ésta es una Guía de orden de inventario.<0}
-
{0><}0{>Convertir una Guía de orden estándar existente en una Guía de orden de inventario<0}
-
{0><}0{>En la ficha Guía de orden, seleccione una guía de orden estándar y haga clic en Renombrar guía de orden.<0}
-
{0><}0{>En la ventana emergente Renombrar guía de orden (a) vuelva a ingresar el Nombre de guía de orden o ingrese un nuevo nombre (b) seleccione la casilla de verificación Guía de orden de inventario y (c) seleccione la ubicación de depósito correspondiente para esta Guía de orden de inventario y haga clic en OK.<0}
-
{0><}0{>La Guía de orden estándar original ha sido actualizada y convertida a una Guía de orden de inventario y tiene los mismos indicadores visuales que tendría si hubiera sido creada como una GO de inventario nueva.<0} {0><}100{>Nota:<0} {0><}0{>una vez que una guía de orden ha sido convertida a una guía de orden de inventario no puede volver a ser una guía de orden estándar.<0}
-
{0><}0{>AGREGAR ARTÍCULOS A INVENTARIO<0}
-
{0><}0{>AGREGAR ARTÍCULOS A INVENTARIO A TRAVÉS DE LA PANTALLA APLICACIÓN.<0}
-
{0><}0{>CATÁLOGO: mediante la búsqueda de Catálogo y del botón Agregar a guía de orden.<0}
-
{0><}72{>CATÁLOGO: mediante la pantalla Artículo sin catálogo y del botón Agregar a guía de orden.<0}
-
{0><}0{>GUÍA DE ORDEN: al copiar el(los) artículo(s) de una guía de orden estándar diferente.<0}
-
{0><}0{>CARRO: mediante el botón Agregar a guía de orden.<0}
-
{0><}88{>ORDEN DE COMPRA: mediante el botón Agregar a guía de orden.<0}
-
{0><}80{>REQUISICIÓN: mediante el botón Agregar a guía de orden.<0}
-
{0><}75{>AGREGAR ARTÍCULOS A INVENTARIO MEDIANTE EL PROCESO DE CARGA.<0}
-
{0><}0{>En la ficha Guía de orden, haga clic en el botón Plantilla guía de orden para descargar una plantilla e ingresar los datos del inventario a cargar.<0}
-
{0><}0{>Una vez que se haya completado la descarga, aparecerá la plantilla con formato de hoja de trabajo de Excel.<0}
-
{0><}0{>Ingrese los datos del Inventario en la plantilla de la siguiente forma:<0} {0><}100{>NOTA:<0} {0><}0{>los valores en la fila 3 de la plantilla indican el tipo de datos permitidos en el campo y el largo (entre paréntesis).<0} {0><}0{>STRING (50) = cualquier valor alfanumérico con un largo total de 50 caracteres, incluidos los espacios.<0} {0><}0{>NUMBER (10) = cualquier número positivo (incluso decimales) con un máximo de 10 dígitos.<0} {0><}0{>Los REGISTROS que no cumplan con estos valores no serán cargados.<0}
-
{0><}0{>Proveedor unidad guardado inv: Número de artículo del distribuidor.<0} {0><}100{>NOTA:<0} {0><}0{>coloque un signo # delante de Proveedor unidad guardado inv. (es decir, <0} {0><}0{>#12345) -- Obligatorio<0}
-
{0><}0{>Cantidad: cantidad de orden predeterminada para un artículo – Opcional<0}
-
{0><}0{>UOM solicitada: precio UOM (también conocido como Orden UOM) definido por el proveedor para los artículos de catálogo.<0} {0><}0{>Ésta es la UOM con que se suele solicitar el artículo al proveedor.<0} {0><}0{>También es la UOM que se carga en los conteos de inventario. Debe ser un sistema válido de unidad de medida -- Obligatorio<0}
-
{0><}0{>Precio unitario de transacción: precio unitario del artículo (en Precio UOM definido más arriba).<0} {0><}0{>Este campo es opcional (pero altamente recomendado) para los artículos sin catálogo, pero es altamente recomendado ya que este valor se utiliza para generar el costo de inventario.<0} {0><}0{>Este valor se genera y se carga durante la noche para todo el contenido del catálogo, de acuerdo con los datos de precios más recientes del proveedor.<0}
-
{0><}0{>Descripción del artículo: descripción del artículo.<0} {0><}0{>Este campo es Obligatorio para los artículos sin catálogo y se generan y cargan para todo el contenido del catálogo, de acuerdo con los datos de catálogo del proveedor para dicho artículo.<0}
-
{0><}0{>Orden de clasificación: utilice valores numéricos para determinar en qué orden se muestran los artículos en la Guía de orden de inventario.<0} {0><}0{>Éste es el tercer orden de clasificación para las hojas Llevar conteo de inventario (después de pasillo y Nº de bandeja).<0} {0><}0{>Si no hay información de pasillo y bandeja disponible, éste es el orden en que se imprimirán los artículos en las hojas Llevar conteo de inventario -- Opcional (pero altamente recomendado)<0}
-
{0><}0{>Cant. mínima: este valor es sólo INFORMATIVO y marca el nivel mínimo deseado de cantidad de artículos a mantener en existencia -- Opcional<0}
-
{0><}92{>Cant. máxima: este valor es sólo INFORMATIVO y marca el nivel máximo deseado de cantidad de artículos a mantener en existencia -- Opcional<0}
-
{0><}0{>Cuenta LM: si utiliza presupuesto, ingrese la cuenta LM VALIDA deseada para que se utiliza con este artículo cuando se usa en una Requisición.<0} {0><}0{>– Opcional<0}
-
{0><}0{>Mercadería: clasificación de artículo – Opcional<0}
-
{0><}0{>Ubicación en el pasillo: ubicación del artículo o localizador de artículo principal dentro del depósito.<0} {0><}0{>Éste es el primer orden de clasificación para las hojas Llevar conteo de inventario -- Opcional (pero altamente recomendado)<0}
-
{0><}62{>Número de bandeja: ID del estante o localizador de artículo menor dentro del depósito.<0} {0><}95{>Éste es el segundo orden de clasificación para las hojas Llevar conteo de inventario -- Opcional (pero altamente recomendado)<0}
-
{0><}0{>Artículos por caja: número de artículos en una caja.<0} {0><}0{>Este valor puede ser ingresado sólo para artículos SIN catálogo y se usa para calcular el factor de conversión de emisión de Orden Obligatorio para artículos sin catálogo, si se completan o se emiten requisiciones en una UOM diferente de la UOM solicitada (orden).<0}
-
{0><}0{>Tamaño del paquete: información del paquete -- Opcional<0}
-
{0><}0{>Emitir código de UOM: UOM estándar en la cual se completaría una requisición para una salida -- Opcional Ejemplo:<0} {0><}0{>Los artículos tienen precios y se venden por caja pero la salida lo solicita por unidad.<0} {0><}0{>Emitir UOM sería por unidad.<0}
-
{0><}0{>Orden para factor de conversión de emisión: el Orden para factor de conversión de emisión se utiliza para calcular la cantidad de UOM ordenada que se usa para completar una requisición en Emitir UOM – Opcional (NOTA:<0} {0><}0{>si se deja vacío, el sistema completará las bases con los artículos por caja)<0}
-
{0><}0{>Cantidad reordenada: cantidad reordenada es el valor utilizado en los cálculos de “Planear compras” (ver sección más adelante) que lleva los niveles de inventario a una cantidad predeterminada.<0} {0><}0{>Este valor es Opcional pero altamente recomendado. Puede agregarse después del hecho.<0}
-
{0><}0{>ID de categoría: este valor es generalmente la categoría de nivel principal o más alta en la que se encuentra el artículo.<0} {0><}0{>Ésta debe ser una ID de categoría válida del sistema.<0} {0><}77{>– Opcional pero altamente recomendado. Puede agregarse después del hecho.<0}
-
{0><}71{>ID de subcategoría: la ID de subcategoría es la segunda categoría de nivel más alto en la que se encuentra el artículo.<0} {0><}100{>Ésta debe ser una ID de categoría válida del sistema.<0} {0><}100{>– Opcional pero altamente recomendado. Puede agregarse después del hecho.<0}
-
{0><}0{>Inventario sin movimiento: ingrese 0 para “No, éste no es un inventario sin movimiento” o 1 para “Sí, éste es un inventario sin movimiento” -- Opcional<0}
-
{0><}0{>Cantidad existente: éste es el balance inicial de inventario para este artículo.<0} {0><}0{>-- Opcional. Puede agregarse después del hecho mediante un ajuste de inventario o al cargar Llevar inventario.<0}
-
{0><}0{>Cargue los datos del inventario<0}
-
{0><}73{>En la ficha Guía de orden, haga clic en el botón Importar guía de orden.<0} {0><}100{>Nota:<0} {0><}0{>Si la Guía de orden de inventario es compartida, sólo el dueño puede importar artículos a sus guías de orden de inventario.<0}
-
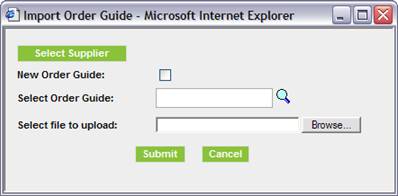
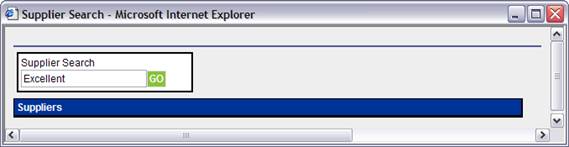
{0><}0{>Haga clic en el botón Seleccionar proveedor<0}
-
{0><}0{>Ingrese un valor de búsqueda en el campo Búsqueda de proveedor y haga clic en IR.<0}
-
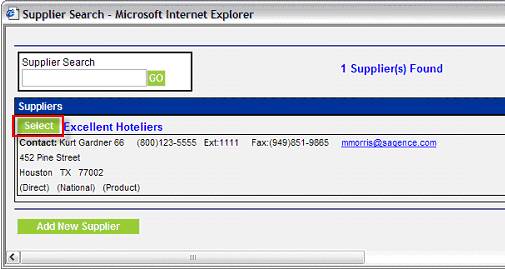
{0><}0{>Seleccione el proveedor apropiado en los resultados de la búsqueda.<0}
-
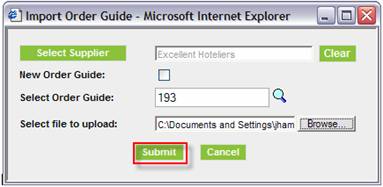
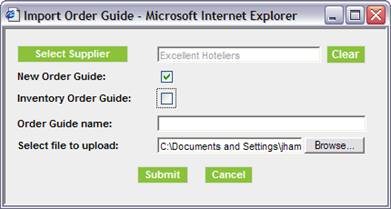
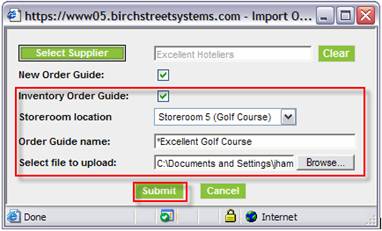
{0><}0{>Se llena el Nombre del proveedor en la ventana emergente Importar guía de orden.<0} {0><}0{>Si ésta es una Guía de orden EXISTENTE, deje esta casilla de verificación sin marcar, seleccione la Guía de Orden apropiada del acercamiento, y busque el archivo a cargar antes de hacer clic en el botón Enviar.<0} {0><}100{>NOTA:<0} {0><}0{>El campo Seleccionar guía de orden se completa no con el nombre de la Guía de orden sino con el número de ID de la guía de orden.<0}
-
{0><}0{>Si ésta es una NUEVA guía de orden, seleccione la casilla de verificación Nueva guía de orden.<0} {0><}0{>Observe que la pantalla cambia en forma dinámica para ubicar la información necesaria para crear la nueva guía de orden.<0}
-
{0><}0{>Al seleccionar la casilla de verificación Guía de orden de inventario, se muestra en forma dinámica otro campo para especificar la ubicación del depósito.<0} {0><}0{>Seleccione la ubicación apropiada de la lista desplegable, agregue un nombre a la nueva Guía de orden de inventario, seleccione el archivo a cargar desde la ubicación en que ha sido guardado en su equipo y haga clic en Enviar.<0} {0><}100{>Nota:<0} {0><}0{>Si ésta es una Guía de orden compartida (es decir, otros usuarios en la propiedad usarán esta Guía de orden para crear requisiciones), coloque un asterisco (*) delante del nombre.<0}
-
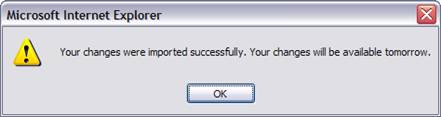
{0><}0{>Se muestra la siguiente confirmación.<0} {0><}100{>NOTA:<0} {0><}0{>Todas las guías de orden cargadas estarán disponibles al día siguiente.<0} {0><}0{>Las cargas son controladas por nuestro grupo de soporte.<0} {0><}0{>Si se encuentran errores, se le comunicará al usuario que realizó la carga.<0}
-
{0><}0{>EDITAR ARTÍCULOS DE INVENTARIO EXISTENTES Y USAR LAS CASILLAS DE VERIFICACIÓN DE LA FICHA DE GUÍA DE ORDEN DE INVENTARIO<0}
{0><}0{>Cree nuevas ubicaciones
para usar como ubicaciones de depósito (inventario).<0} {0><}0{>Los depósitos son
ubicaciones definidas donde actualmente se mantiene el inventario en la
propiedad.<0} {0><}0{>Un depósito puede albergar
tantas Guías de orden de inventario como sea necesario (Paso 1.2) pero cada
artículo de todas las guías de orden de inventario asociadas con un depósito
debe ser único (es decir, no se permiten artículos duplicados en el mismo
depósito).<0}

{0><}0{>El módulo de Inventario Birch Street hace que la Ficha de Guía de orden (GO) gestione el proceso de Inventario.<0} {0><}0{>Un nuevo tipo de GO, la GO “Inventario” ha sido desarrollada para albergar los artículos de inventario y funcionar como “Inventario principal” para un depósito específico.<0} {0><}0{>Existen tres formas de crear una GO de inventario.<0} {0><}0{>El usuario puede (a) crear una nueva GO, (b) convertir una GO estándar existente en una GO de inventario o (c) importar una nueva GO de inventario.<0}
{0><}0{>CONSEJO:<0} {0><}0{>No se puede volver a cambiar una GO de inventario a una GO estándar.<0} {0><}0{>Para crear una GO con los artículos que desea, cree una GO estándar y modifíquela hasta que quede exactamente como desea.<0} {0><}0{>Cuando esté lista, cámbiela de GO estándar a GO de inventario.<0}
{0><}100{>Nota:<0} {0><}0{>Para crear una nueva Guía de orden de inventario, usted debe tener acceso de seguridad.<0}
{0><}0{>Usted puede convertir una Guía de orden estándar en una Guía de orden de inventario si (a) la GO estándar NO tiene artículos duplicados en ella y (b) el depósito que se asociará con la GO no tiene los mismos artículos.<0} {0><}0{>(El mismo artículo no puede ser incluido en una Guía de orden separada utilizando el mismo depósito; no se permiten artículos duplicados en ninguna ubicación de depósito).<0}

{0><}0{>Los artículos se agregan a las guías de orden de inventario mediante la misma metodología utilizada para agregar artículos a las guías de orden estándar.<0} {0><}0{>Sencillamente marque la(s) casilla(s) de verificación para el(los) artículo(s), haga clic en el botón Agregar a guía de orden y seleccione la Guía de orden de inventario apropiada.<0}
{0><}84{>Consejo:<0} pueden agregarse {0><}0{>los artículos de la OC registrada a una
Guía de orden inventario por medio del Carro y/o el botón Agregar a GO en la
ficha Orden de compra.<0} {0><}0{>Para agregar artículos al inventario que todavía no están
en la OC, “compre” el artículo en el sitio del proveedor, llévelo a la OC y luego
use la función Agregar a carro antes de colocar los artículos en la Guía de
orden de inventario.<0} {0><}0{>Luego podrá borrar esta OC si lo desea
Esta forma se puede realizar mediante las siguientes fichas:<0}
{0><}0{>Se pueden agregar artículos a una Guía de orden de inventario nueva o una ya existente.<0}


{0><}100{>CONSEJO:<0} {0><}0{>Si usted NO asigna Pasillo y/o Número de bandeja, asegúrese de definir un Orden de clasificación para esta plantilla.<0} {0><}0{>Es absolutamente necesario definir el orden de clasificación de las hojas Llevar conteo de inventario para que realizar el inventario físico sea un proceso fácil y más rápido.<0}
{0><}100{>CONSEJO:<0} {0><}0{>El método más sencillo para cargar balances iniciales de inventario en su módulo de inventario es agregar los balances iniciales en esta plantilla.<0} {0><}0{>En cambio, si su departamento de Finanzas requiere que se registren las transacciones en un informe de ajustes para las transacciones iniciales de balance, deje la cantidad existente vacía en esta plantilla y cargue los balances iniciales de inventario mediante el proceso Llevar inventario (vea sección más adelante).<0}
{0><}0{>Edite los artículos de inventario
existentes en la ficha Guía de orden con una Guía de orden de tipo Inventario
cargada.<0}
{0><}100{>NOTA:<0} {0><}0{>Los siguientes botones se desactivan si se carga una Guía
de orden de inventario:<0}
{0><}0{>* ELIMINAR GUÍA DE ORDEN
* ELIMINAR ARTÍCULO
Esto se hace para asegurar la integridad de los conteos de inventario.<0} {0><}0{>Comuníquese con el Soporte Birch Street para obtener ayuda
con cualquiera de estas solicitudes.<0}
-
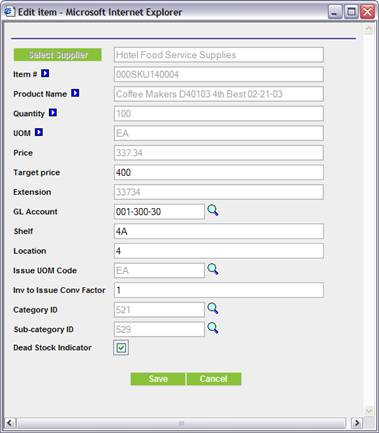
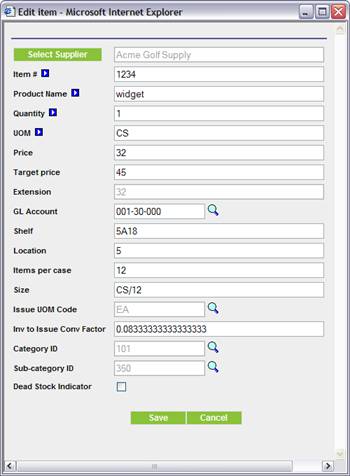
{0><}0{>Editar artículo: acceda a Editar artículo desde la ficha Guía de orden, con la Guía de orden de inventario apropiada seleccionada.<0} {0><}72{>Haga clic en Guardar para guardar los cambios.<0}
-
{0><}0{>Estante: ingrese la información de número de estante/bandeja para el artículo.<0}
-
{0><}70{>Ubicación: ingrese la información de ubicación del pasillo para el artículo.<0}
-
{0><}0{>Emitir código de UOM: Si Emitir UOM (UOM de la requisición de salida) es diferente de la UOM del artículo en el inventario, ingrese el código UOM de emisión para este artículo.<0}
-
{0><}72{>Inventario para emitir factor de conversión: Si Emitir UOM (UOM de la requisición de salida) es diferente de la UOM del artículo en el inventario, ingrese el factor de conversión que relaciona las dos UOM en cuestión.<0} {0><}0{>Por ejemplo, si se compra y se mantiene el artículo de inventario en una caja, Emitir UOM es EA (unitario) y existen 12 EA en 1 caja, el factor de conversión es igual a 0,0833 (1 caja dividido por 12 ea = 0,0833).<0}
-
{0><}0{>Artículos por caja: disponible solamente para los artículos sin catálogo.<0} {0><}0{>Se utiliza para calcular el Inventario para emitir factor de conversión para artículos sin catálogo.<0}
-
{0><}0{>ID de categoría e ID de subcategoría: acérquese para seleccionar las referencias de categoría de la jerarquía de categoría.<0} {0><}0{>Sólo con fines informativos.<0}
-
{0><}74{>Indicador de inventario sin movimiento: casilla de verificación.<0} {0><}94{>Sólo con fines informativos.<0}
-
{0><}0{>Casillas de verificación de la ficha Guía de orden para Inventario<0}
{0><}0{>Editar artículos: artículos de catálogo<0}
{0><}84{>Editar artículos: artículos sin catálogo<0}
-
{0><}0{>Mostrar UOM de la requisición: muestra la columna UOM de requisición donde el usuario puede reemplazar la Orden de UOM normal en la que se solicita este artículo.<0} {0><}0{>Cuando se solicite el artículo de esta Guía de orden de inventario, la requisición utilizará la UOM de requisición junto la cantidad ingresada en la columna Cantidad de orden en la Guía de orden de inventario.<0}
-
{0><}0{>Mostrar inventario: muestra las columnas Cantidad existente, Reordenar cantidad y Costo de la factura.<0} {0><}0{>El valor ingresado en el campo Reordenar cantidad se usa para determinar la cantidad recomendada que se volverá a ordenar al planificar las compras, para volver los niveles de inventario a esta cantidad.<0}
{0><}100{>Nota:<0} {0><}0{>La extensión siempre aparece utilizando
el Precio UOM (la cantidad de orden multiplicada por el Precio UOM) aunque la
UOM de requisición sea diferente.<0} {0><}0{>Sin embargo,
se creará la requisición utilizando el precio asociado con la UOM de
requisición multiplicada por la cantidad ordenada.<0}
{0><}0{>Flujo de proceso<0}
{0>
Junto con la implementación del módulo Inventario se encuentra un módulo complementario:
<0}
{0><}0{>Requisiciones (REG).<0} {0><}0{>Las requisiciones son documentos
anteriores a las órdenes de compra y, en la práctica, son muy similares a las
órdenes de compra dentro de la aplicación Birch Street.<0} {0><}0{>Se pueden asignar cuentas LM a las
requisiciones, se las puede enrutar a través de procesos de aprobación, etc.,
de manera muy similar a una OC.<0} {0><}0{>Hemos diseñado el módulo
Requisición Birch Street en base al proceso típico utilizado en propiedades de
servicio completo para solicitar artículos para varias salidas desde un
depósito central.<0} {0><}0{>Un usuario en la salida determina que
necesita 5 manufacturas del depósito y crea una requisición en Birch Street
para estos artículos.<0} {0><}0{>El depósito intentará cumplir con esta
requisición con los artículos de inventario.<0} {0><}0{>Si en el inventario hay una cantidad menor
de artículos, entonces se crea una orden de compra por la cantidad especificada
o por la diferencia calculada más la cantidad necesaria para hacer que la
cantidad existente vuelva a ser la cantidad reordenada.<0} {0><}0{>La siguiente sección explica en forma más
detallada el proceso de Requisición.<0}
-
{0><}0{>CREAR UNA GUÍA DE ORDEN PARA USUARIO DE REQUISICIÓN<0}
-
{0><}84{>En la ficha Guía de orden, seleccione el botón Crear guía de orden.<0}
-
{0><}0{>Ingrese un Nombre (para uso compartido colóquele un asterisco (*) adelante) y marque la casilla de verificación etiquetada:<0} {0><}84{>Artículos de inventario<0}
-
{0><}0{>Se crea la “GO para usuario de requisición” y la ficha Guía de orden se carga previamente con una nueva GO “vacía”.<0} {0><}100{>NOTA:<0} {0><}0{>No existe ubicación de almacén asignada a la GO para usuario de requisición hasta que se agrega el primer artículo.<0}
-
{0><}62{>AGREGAR ARTÍCULOS A UNA GUÍA DE ORDEN PARA USUARIO DE REQUISICIÓN<0}
-
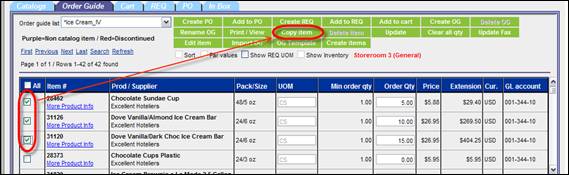
{0><}0{>En una GO IV existente, seleccione los artículos que agregará a la Guía de orden para usuario de requisición y haga clic en el botón Copiar artículo.<0}
-
{0><}0{>Seleccione la Guía de orden para usuario de requisición adecuada (creada en el paso 2.1).<0} {0><}0{>Sólo las guías de orden de usuario de requisición están disponibles para seleccionar en esta ventana emergente.<0}
-
{0><}0{>Los artículos seleccionados se agregan a la guía de orden de usuario de requisición.<0} {0><}100{>NOTA:<0} {0><}0{>Todos los artículos de una guía de orden de usuario de requisición deben provenir de la misma ubicación de depósito.<0} {0><}0{>La ubicación de depósito se determina mediante la ubicación de depósito del primer artículo agregado a la Guía de orden para usuario de requisición.<0}
-
{0><}0{>CREAR Y ENVIAR UNA REQUISICIÓN DE DEPÓSITO (REG).<0}
-
{0><}0{>Crear una requisición de depósito<0}
-
{0><}60{>En la ficha Guía de orden, seleccione la GO de inventario o GO de usuario de equisición correspondiente.<0} {0><}0{>Haga clic en la casilla de verificación Mostrar UOM de la requisición para mostrar la UOM de requisición.<0} {0><}0{>La UOM de requisición reemplazará a la Orden UOM.<0} {0><}100{>NOTA:<0} {0><}0{>La UOM de la requisición es la UOM en la que el requisitante solicita el artículo.<0} {0><}0{>La orden UOM es la UOM en la que el empleado del depósito coloca la orden con el proveedor.<0}
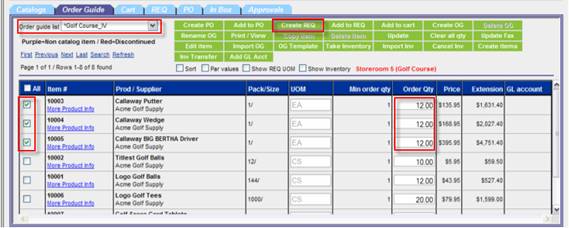
{0><}0{>Seleccione los artículos que colocará en la requisición, agregue las cantidades en la UOM de requisición y haga clic en Crear requisición.<0} {0><}100{>Nota:<0} {0><}0{>Se pueden agregar artículos de múltiples proveedores a una requisición.<0} -
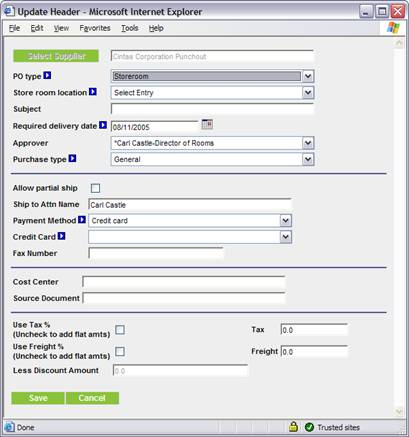
{0><}0{>En la ventana emergente Crear requisición, agregue los datos Obligatorios, incluso los mencionados a continuación, y haga clic en OK:<0}
-
{0><}100{>Fecha de entrega obligatoria<0}
-
{0><}0{>Aprobador (si es necesario)<0}
-
{0><}72{>Tipo de compra: Comida, Bebida o General.<0}
-
{0><}89{>Departamento<0} {0><}100{>Nota:<0} {0><}0{>Si se utiliza un presupuesto, el Departamento muestra la lista de cuentas LM disponibles en las que se cargará esta requisición.<0} {0><}0{>De esta forma, el código de departamento principal del usuario será el predeterminado.<0}
-
{0><}67{>Cuenta LM Nota:<0} {0><}0{>Obligatoria únicamente si utiliza un presupuesto.<0}
-
{0><}0{>Tipo de requisición: Siempre “Depósito”.<0}
-
{0><}0{>Ubicación de depósito: Es la de la Guía de orden de forma predeterminada; de lo contrario, seleccione de la lista desplegable el depósito apropiado desde el cual se solicita el artículo.<0} {0><}100{>Nota:<0} {0><}0{>Si el artículo no está en el depósito seleccionado, SERÁ AGREGADO al depósito.<0}
-
{0><}0{>Número BEO: (opcional, sólo con fines informativos)<0}
-
{0><}71{>Retirar o entregar: (opcional, sólo con fines informativos)<0}
-
{0><}78{>Hora de entrega: (opcional, sólo con fines informativos)<0}
-
{0><}0{>Utilizar % de impuesto: Sí, utilice %, No, utilice monto fijo – (opcional)<0}
-
{0><}0{>Impuesto: % o monto fijo – (opcional)<0}
-
{0><}93{>Utilizar % de flete: Sí, utilice %, No, utilice monto fijo – (opcional)<0}
-
{0><}89{>Flete: % o monto fijo – (opcional)<0}
-
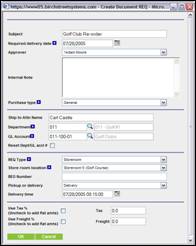
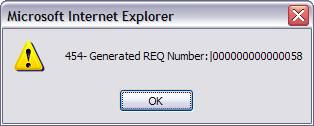
{0><}0{>La requisición fue creada. Haga clic en OK<0}
-
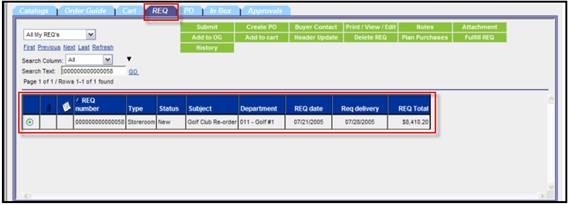
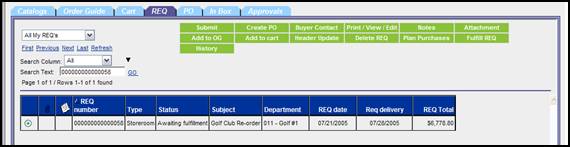
{0><}0{>La aplicación conduce al usuario a la ficha Requisición, luego filtra y muestra la requisición recién creada.<0}
-
{0><}0{>Editar requisiciones (SOLAMENTE en estado Nueva)<0}
-
{0><}0{>Editar información de encabezado de requisición<0}
-
{0><}0{>En la ficha Requisición, ubique y seleccione la Requisición y haga clic en el botón Actualizar encabezado.<0}
-
{0><}0{>En la ventana emergente Actualización de encabezado de Requisición, edite los datos requeridos y haga clic en OK.<0}
-
{0><}0{>Editar artículos de línea<0}
-
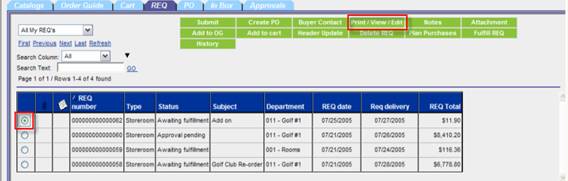
{0><}82{>En la ficha Requisición, ubique y seleccione la Requisición y haga clic en el botón Imprimir/Ver/Editar.<0}
-
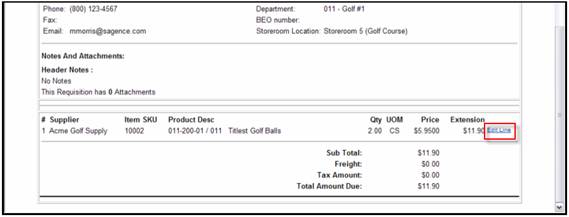
{0><}0{>En la pantalla “Imprimir/Ver/Editar” de la requisición, desplácese hacia la sección artículo de línea y haga clic en el vínculo “Editar línea”.<0}
-
{0><}0{>Para un Artículo de catálogo, en la pantalla emergente Editar línea, edite la cantidad, el departamento y/o la cuenta LM.<0} {0><}0{>Para eliminar el artículo de línea, haga clic en el botón Eliminar.<0} {0><}89{>Haga clic en Guardar para guardar los cambios realizados.<0} {0><}100{>Nota:<0} {0><}0{>Realice los cambios finales en la información de presupuesto si la requisición tiene estado “Nueva”.<0} {0><}0{>No se puede cambiar la información de presupuesto en el momento de entrega de la orden de compra.<0} {0><}0{> El presupuesto disminuye durante el proceso de Cumplimiento de la requisición.<0}
-
{0><}62{>Para un Artículo sin catálogo, en la pantalla emergente Editar línea, edite cualquiera de los campos (excepto el campo Exento de impuesto).<0} {0><}100{>Nota:<0} {0><}0{>Al cambiar el Número de artículo, creará un nuevo artículo.<0} {0><}100{>Para eliminar el artículo de línea, haga clic en el botón Eliminar.<0} {0><}100{>Haga clic en Guardar para guardar los cambios realizados.<0}
-
{0><}0{>Enviar una requisición de depósito mediante el proceso de aprobación.<0}
-
{0><}0{>En la ficha Requisición, seleccione la requisición (debe tener estado “Nueva”) y haga clic en el botón Enviar.<0} {0><}0{>Luego de actualizar la ficha, el estado cambiará a Autorización pendiente, si la propiedad utiliza la función Aprobación.<0}
-
{0><}0{>Aparecerá un mensaje indicando que la requisición fue enviada.<0} {0><}94{>Haga clic en OK.<0}
-
{0><}0{>El nuevo estado de la requisición será “Autorización pendiente”<0}
-
{0><}0{>El aprobador podrá editar la requisición de la misma forma en que edita una orden de compra, mediante el botón Editar en la cuadrícula Aprobación para sustituir la cantidad y el producto, y el botón Imprimir/Ver/Editar para realizar cambios en cuenta LM y Departamento.<0}
-
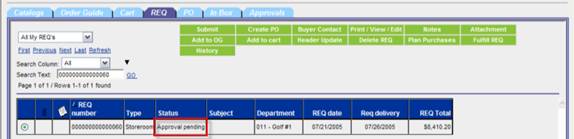
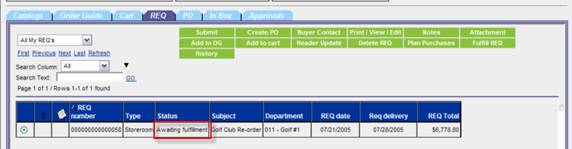
{0><}0{>Una vez que el Aprobador ha aprobado la requisición y el requisitante ha enviado la requisición al depósito, el estado de la requisición se actualizará a “Esperando cumplimiento”.<0} {0><}0{>Sólo las requisiciones con estado “Esperando cumplimiento” se incluirán en el proceso Planear compras.<0}
-
{0><}67{>PLANEAR COMPRAS<0}
-
{0><}0{>Planear compras por salida (Departamento)<0}
-
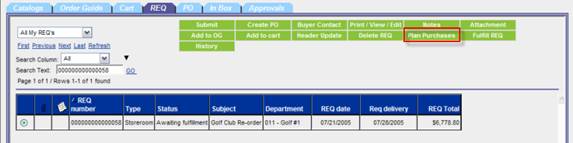
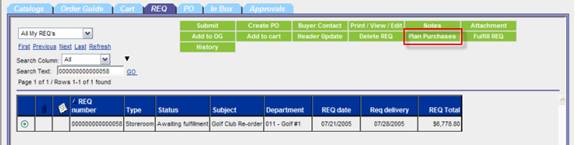
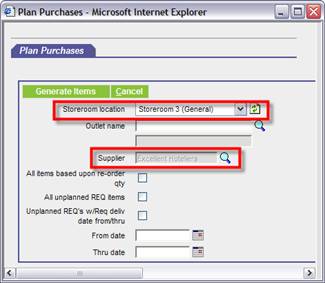
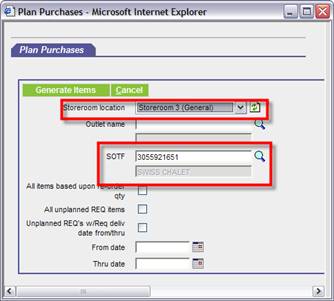
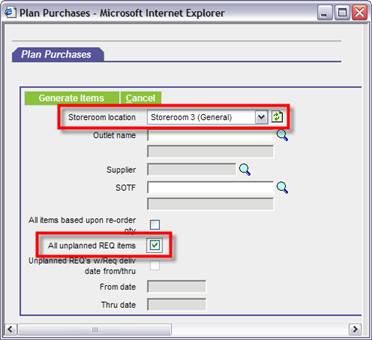
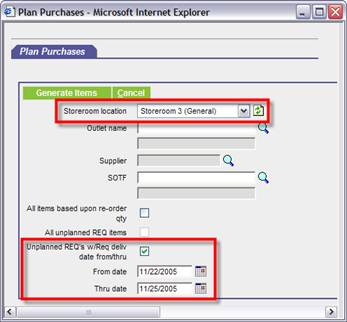
{0><}0{>En la ficha Requisición, haga clic en el botón Planear compras.<0}
-
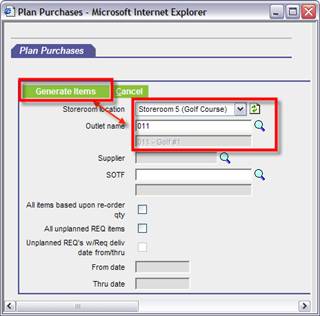
{0><}0{>En la ventana emergente Planear compras, seleccione la ubicación de Depósito y Salida apropiadas y haga clic en el botón Generar artículos.<0}
-
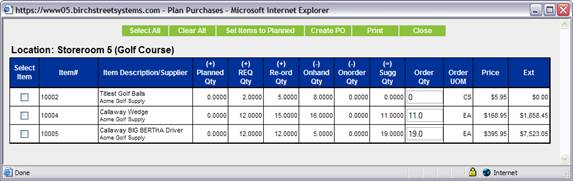
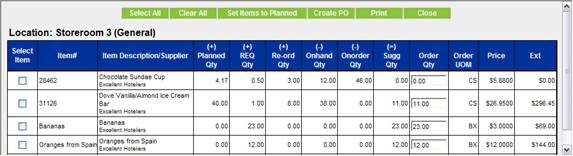
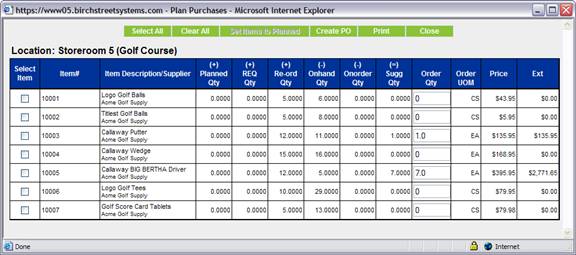
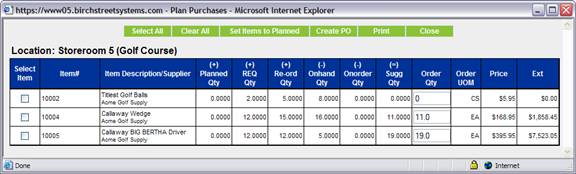
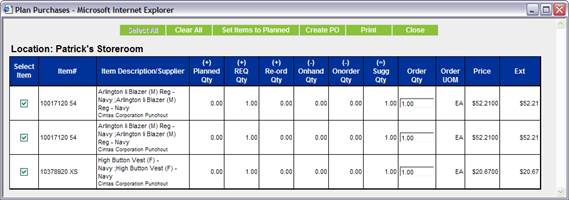
{0><}0{>La ventana emergente mostrará de forma dinámica la siguiente cuadrícula Planear compras.<0} {0><}0{>La cuadrícula muestra todos los artículos en la requisición con estado “Esperando cumplimiento” para esta salida, sin importar si la cantidad existente es suficiente para cumplir con la requisición.<0}
-
{0><}0{>La cuadrícula Planear compras posee 5 columnas de cantidad que la aplicación utiliza para calcular una cantidad sugerida de compra.<0} {0><}0{>La cantidad de orden se llena previamente con la cantidad calculada sugerida, pero el usuario puede sobrescribirla.<0}
-
{0><}0{>Cantidad planeada: Es la cantidad que anteriormente se planificó comprar de este artículo en una requisición, pero que aún no se completó para salida.<0}
-
{0><}0{>Cantidad solicitada: Es la cantidad de este artículo en las requisiciones no planeadas.<0}
-
{0><}0{>Cantidad reordenada: Es la cantidad deseada de este artículo para mantener un nivel de inventario equiparado.<0} {0><}0{>Esta cantidad se muestra y edita en la ficha Guía de orden cuando se selecciona la casilla de verificación “Mostrar inventario”.<0}
-
{0><}0{>Cantidad existente: Es la cantidad existente actual de este artículo en el inventario.<0}
-
{0><}0{>Cantidad en orden: Es la cantidad en orden de este artículo, pero que todavía no se recibió del proveedor.<0}
-
{0><}0{>Cantidad sugerida: La cantidad sugerida se calcula de la siguiente forma:<0} {0><}0{>Cantidad planeada + Cantidad en requisición + Cantidad reordenada – Cantidad existente – Cantidad en orden.<0}
-
{0><}0{>Se deben seleccionar los artículos para que sean planeados, ya sea mediante la creación de una orden de compra o al marcar el artículo como planeado.<0} {0><}0{>Los botones de acción Compras planeadas son:<0}
-
{0><}0{>Seleccionar todo: Selecciona todos los artículos en la cuadrilla Planear compras.<0}
-
{0><}0{>Borrar todo: Borra todos los artículos seleccionados en la cuadrícula.<0}
-
{0><}0{>Confirmar artículos planificados: Confirma todos los artículos seleccionados en la requisición como planeados.<0} {0><}0{>NO confirme un artículo como “Planeado” si se lo incluirá en una Orden de compra (paso 2.4.1.5.4). Al marcar un artículo como “planeado” se aumenta la cantidad planificada para este artículo y se evita que este artículo de requisición sea incluido en una lista posteriormente creada de compras planeadas.<0} {0><}0{>Los posibles motivos para usar la función “Confirmar artículo planificado” son si no hay cantidad existente en inventario del artículo o si el usuario de depósito planea realizar compras después del hecho, es decir, ya se cumplió la requisición.<0}
-
{0><}0{>Crear OC: Confirma los artículos de requisición marcados como planificados y comienza el proceso de creación de OC.<0} {0><}0{>Este proceso es igual al de creación de una OC desde el Contenido del catálogo o de una Guía de orden estándar, excepto que no se recabe información de presupuesto a nivel de la OC. <0} {0><}0{>La información de presupuesto se procesa mediante el cumplimiento de la requisición.<0} {0><}0{>Si se ha confirmado un artículo como planificado por error (paso 2.4.1.5.3), se lo puede incluir de todos modos en una OC al marcarlo nuevamente y utilizar el botón Crear OC.<0}
-
{0><}0{>Imprimir: Imprime la cuadrícula Planear compras.<0}
-
{0><}0{>Cerrar: Cierra/cancela el proceso Planear compras.<0}
-
{0><}0{>Planificar compras por proveedor<0}
-
{0><}100{>En la ficha Requisición, haga clic en el botón Planear compras.<0}
-
{0><}0{>Para proveedores con contenido de catálogo en el sistema, seleccione el Depósito apropiado y realice un acercamiento para seleccionar el proveedor correspondiente.<0} {0><}0{>Para proveedores sobre la marcha, ingrese o realice un acercamiento para obtener el número de fax de los proveedores.<0} {0><}67{>Haga clic en el botón Generar artículos.<0}
-
{0><}82{>Generar artículos mostrará de forma dinámica la siguiente cuadrícula Planificar compras.<0} {0><}88{>La cuadrícula muestra todos los artículos en la requisición que se encuentran en el estado “Esperando cumplimiento” y todavía están “No planeados” para este proveedor, sin importar si hay cantidad existente suficiente para cumplir con la requisición.<0} {0><}100{>Nota:<0} {0><}0{>Los artículos se expresan en Orden UOM.<0} {0><}0{>Si la requisición usa UOM de requisición, la cantidad se convertirá automáticamente a Orden UOM para agregar otras órdenes de compra y ser una UOM aceptable para el proveedor.<0}
-
{0><}0{>Verifique los artículos a comprar, ingrese/edite las cantidades de orden y haga clic en Crear OC como se describe en las secciones 2.4.1.4 y 2.4.1.5.<0} {0><}100{>NOTA:<0} {0><}0{>Cuando planifique compras para un depósito completo, los artículos no se configuran como planificados, dado que todavía no están asociados con ninguna requisición específica.<0}
-
{0><}67{>Planear compras por salida y proveedor<0}
-
{0><}0{>Este método combina tanto las variables proveedor como salida para planear compras para un conjunto más limitado de artículos (es decir,<0} {0><}0{>se incluirán en la planificación sólo los artículos de requisiciones para una salida específica y de un proveedor específico).<0}
-
{0><}0{>En la ventana emergente Planear compras, ingrese la información de Salida y Proveedor antes de hacer clic en Generar artículos.<0}
-
{0><}0{>Planear compras en base a cantidades iguales.<0}
-
{0><}100{>En la ficha Requisición, haga clic en el botón Planear compras.<0}
-
{0><}60{>En la ventana emergente Planear compras, seleccione la casilla Todos los artículos basados en cantidad reordenada y haga clic en el botón Generar artículos.<0} {0><}0{>Esto generará artículos donde la cantidad reordenada no es suficiente, inlcuso si no existe una requisición específicamente creada para un artículo.<0}
-
{0><}100{>La ventana emergente mostrará de forma dinámica la siguiente cuadrícula Planear compras.<0} {0><}0{>La cuadrícula muestra todos los artículos en el depósito seleccionado, donde la cantidad reordenada para el artículo en la Guía de orden de inventario asociada es mayor que cero.<0}
-
{0><}100{>Verifique los artículos que comprará, ingrese/edite las cantidades de orden y haga clic en Crear OC, como se describe en la sección 2.4.1.4 y 2.4.1.5.<0} {0><}100{>NOTA:<0} {0><}100{>Cuando planifique compras para un depósito completo, los artículos no se configuran como planificados, dado que todavía están asociados con ninguna requisición específica.<0}
-
{0><}0{>Planear compras para todas las requisiciones no planificadas.<0}
-
{0><}100{>En la ficha Requisición, haga clic en el botón Planear compras.<0}
-
{0><}73{>En la ventana emergente Planear compras, seleccione la casilla de verificación Todos los artículos de la requisición no planeados y haga clic en el botón Generar artículos.<0}
-
{0><}100{>La ventana emergente mostrará de forma dinámica la siguiente cuadrícula Planear compras.<0} {0><}0{>La cuadrícula muestra todos los artículos no planificados en el depósito seleccionado, independientemente de la salida que los solicita.<0}
-
{0><}73{>Verifique los artículos que planeará o comprará, ingrese/edite las cantidades de orden y haga clic en Confirmar artículos planificados o en Crear OC, como se describe en la sección 2.4.1.4 y 2.4.1.5.<0}
-
{0><}61{>Planear compras para todas las requisiciones no planificadas para un determinado rango de fecha.<0}
-
{0><}100{>En la ficha Requisición, haga clic en el botón Planear compras.<0}
-
{0><}0{>En la ventana emergente Planear compras, marque la casilla de verificación Requisiciones no planeadas con fecha de entrega desde/hasta, ingrese o seleccione las fechas Desde/hasta en que desea planificar compras y haga clic en el botón Generar artículos.<0}
-
{0><}100{>La ventana emergente mostrará de forma dinámica la siguiente cuadrícula Planear compras.<0} {0><}0{>La cuadrícula muestra todos los artículos no planificados en el depósito seleccionado que tienen fecha de entrega solicitada dentro del rango de fecha provisto, independientemente de la salida que los solicitó.<0}
-
{0><}99{>Verifique los artículos que planificará o comprará, ingrese/edite las cantidades de orden y haga clic en Confirmar artículo planificado se describe en la sección 2.4.1.4 y 2.4.1.5.<0}
-
{0><}0{>Quitar la planificación de una compra anteriormente “planeada”<0}
-
{0><}0{>En la ficha Requisición, seleccione la requisición con el artículo al que necesita quitar la planificación y haga clic en el botón Imprimir/Ver/Editar. <0}
-
{0><}0{>Seleccione el artículo de línea de la requisición a la que necesita quitar la planificación y haga clic en el vínculo que se encuentra al lado Editar línea.<0}
-
{0><}61{>Haga clic en el botón No plan.<0} {0><}100{>NOTA:<0} {0><}0{>Esto permite que aparezca un artículo de esta requisición nuevamente en la ventana Planear compras.<0}
-
{0><}63{>Cierre la ventana “Imprimir/Ver/Editar”<0}
-
{0><}0{>ORDENES DE COMPRA DE REGISTRO CON ARTÍCULOS DE INVENTARIO<0}
-
{0><}0{>Los compradores crearán y enviarán la requisición con los artículos de registro de forma habitual (Sección 2.1).<0} {0><}0{>(Esto supone que el artículo de registro ya están en una GO de inventario.)<0}
-
{0><}0{>En la ventana Compras planificadas, seleccione los artículos del vendedor de registro e Imprima la ventana emergente Planear compras.<0} {0><}0{>La impresión se utilizará para que haga sus compras mientras esté en el sitio Registro.<0}
-
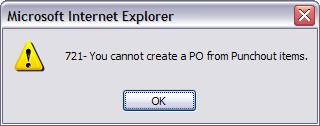
{0><}100{>Nota:<0} {0><}0{>Si el usuario intenta Crear una orden de compra con estos artículos, se muestra el siguiente mensaje.<0} {0><}80{>Haga clic en el botón OK.<0}
-
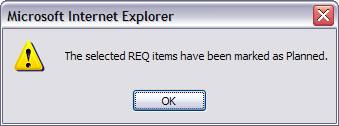
{0><}0{>Haga clic en el botón Confirmar artículos planificados, ya que no creará una OC desde la ventana Planear compras.<0} {0><}0{>Se mostrará el siguiente mensaje.<0} {0><}98{>Haga clic en el botón OK.<0}
-
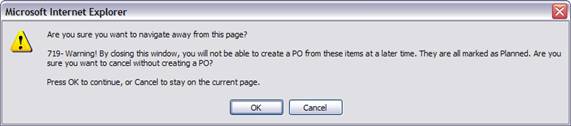
{0><}84{>Se muestra el siguiente mensaje.<0} {0><}0{>Haga clic en OK para continuar.<0}
-
{0><}0{>En la impresión de la pantalla emergente Planear compras (Sección 2.3.2), haga clic en el vínculo del logotipo Registro en la ficha Catálogo.<0} {0><}0{>Compre y salga del sitio Registro regresando a la Orden de compra de registro en Birch Street.<0} {0><}69{>En la ficha OC, seleccione la Orden de compra de registro y haga clic en el botón Actualización de encabezado.<0}
-
 {0><}0{>En la ventana emergente Actualización de encabezado,
seleccione la lista desplegable Tipo de OC y, a continuación, seleccione
la opción Depósito.<0}
{0><}0{>En la ventana emergente Actualización de encabezado,
seleccione la lista desplegable Tipo de OC y, a continuación, seleccione
la opción Depósito.<0}
{0><}100{>NOTA:<0} {0><}0{>Si el Tipo de OC no está configurado como “Depósito”, el evento Recepción para esta OC NO actualizará los balances de inventario.<0}
-
{0><}0{>Observe que los campos Departamento y Cuenta LM estarán ocultos al seleccionar el valor “Depósito”.<0} {0><}0{>La OC depósito no consume montos del presupuesto hasta que se completa la requisición asociada con la orden de compra.<0}
-
{0><}0{>Guarde y envíe la OC nuevamente al Proveedor registrado de forma habitual.<0}
-
{0><}67{>COMPLETAR REQUISICIÓN<0}
-
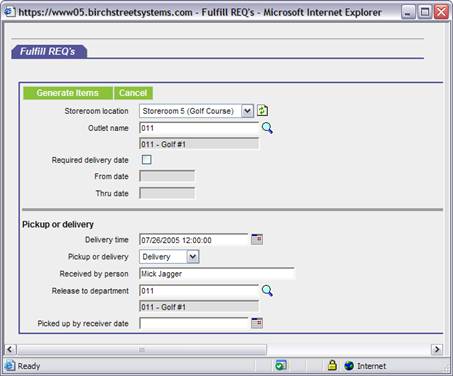
{0><}84{>En la ficha Requisición, haga clic en el botón Completar requisición.<0}
-
{0><}62{>En la ventana emergente Completar requisición, ingrese los siguientes datos obligatorios y opcionales y haga clic en Generar artículos.<0}
-
{0><}0{>Ubicación de depósito: Es el depósito desde donde se completarán los artículos.<0} {0><}0{>-- OBLIGATORIO<0}
-
{0><}0{>Nombre de salida: Es el departamento desde el que serán entregados/retirados los artículos -- OBLIGATORIO<0}
-
{0><}0{>Fecha de entrega solicitada: Marque esta casilla de verificación sólo si se cumplen requisiciones dentro de un rango específico de fecha, como se identifica en los campos Desde fecha y Hasta fecha.<0} {0><}100{>– Opcional<0}
-
{0><}0{>Campos Retirar o entregar: Esta información es opcional.<0} {0><}0{>Se puede imprimir la lista Completar con esta información.<0}
-
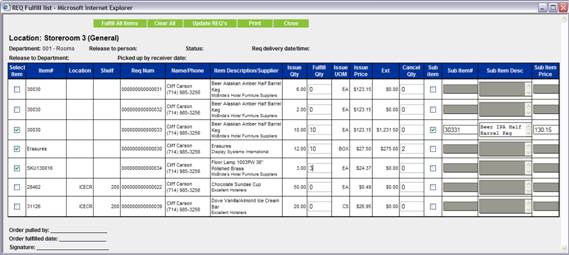
{0><}0{>La ventana emergente Completar requisición muestra de forma dinámica todos los artículos en cualquier requisición con artículos planificados que aún deben cumplirse para la salida seleccionada (paso 2.3.2.2).<0}
-
{0><}0{>El botón Completar artículos seleccionará todos los artículos en la cuadrícula y llenará automáticamente el campo Completar cantidad de la cuadrícula con el campo Emitir cantidad, que se llena con la Cantidad solicitada para el artículo en la requisición.<0} {0><}100{>NOTA:<0} {0><}0{>El campo Completar cantidad se puede editar para que el usuario reemplace este valor si así lo desea.<0}
-
{0><}0{>El botón Borrar todo borrará todos los valores en los campos Seleccionar artículo y Completar cantidad.<0}
-
{0><}0{>El botón Actualizar requisición actualiza los artículos seleccionados con los detalles relacionados con el cumplimiento procesados y mantiene los artículos de línea abiertos o no completados en la requisición.<0} {0><}0{>De esta manera, se actualiza el estado de la requisición a Cumplimiento completo o parcial y las reducciones de la cantidad existente en el inventario.<0}
-
{0><}0{>El campo Cancelar cantidad en la cuadrícula permite al usuario cerrar toda o parte de la cantidad de un artículo de línea específico solicitado.<0}
-
{0><}0{>Los campos Subartículo permiten al usuario sustituir una artículo por el solicitado al marcar la casilla de verificación, completando los datos descriptivos en los campos Número de subartículo y Descripción de Subartículo e ingresado el precio unitario para el artículo sustituto en el campo Precio de subartículo.<0} {0><}0{>Al utilizar los campos subartículos, la requisición original se completa utilizando los artículos sustitutos.<0} {0><}0{>Si utiliza un artículo de proveedor existente y se encuentra en la GO de inventario, disminuirá la cantidad existente.<0} {0><}0{>Si utiliza un artículo sin catálogo, se agregará a la GO de inventario y disminuirá.<0} {0><}100{>Nota:<0} {0><}0{>El artículo sustituto debe mencionarse en la lista en la misma UOM que la requisición original.<0}
-
{0><}0{>Llene la cuadrícula con los datos solicitados y haga clic en el botón Actualizar requisición para procesar la transacción de cumplimiento.<0} {0><}0{>El artículo de requisición se marca como completado para la cantidad especificada y se reduce la cantidad existente en la ficha Guía de orden en esa misma cantidad.<0}
-
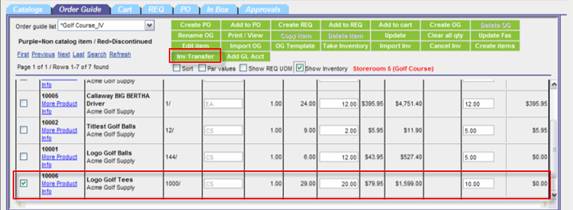
{0><}0{>TRANSFERENCIAS DE INVENTARIO<0}
-
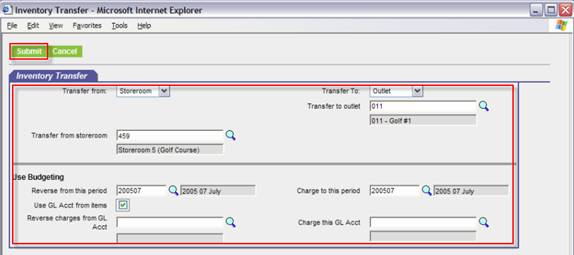
{0><}0{>En la ficha Guía de orden con la guía de orden de inventario correspondiente cargada, seleccione el artículo a transferir y haga clic en el botón Transferencia de inventario.<0} {0><}100{>Nota:<0} {0><}0{>Este botón también está disponible para utilizar en la ficha Carro para los artículos de Inventario colocados en el Carro.<0} {0><}0{>Sin embargo, los artículos en el carro que no coinciden con el depósito en “Transferir desde” no serán incluidos en la transferencia.<0}
-
{0><}63{>Se mostrará la pantalla emergente Transferencia de inventario.<0} {0><}0{>Ingrese la información Transferir desde y Transferir hacia y los datos de presupuesto correspondientes si usa presupuesto, y haga clic en Enviar.<0} {0><}0{>Se vuelve a crea un registro de Ajuste de presupuesto.<0} {0><}100{>Nota:<0} {0><}0{>Una transferencia de depósito a depósito actualiza la cantidad existente pero no repercute sobre el presupuesto, de manera que no es necesario llenar Usar presupuesto.<0}
-
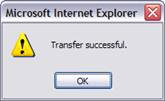
{0><}0{>El sistema mostrará el siguiente mensaje que indica que la transferencia fue exitosa.<0}
-
{0><}67{>AJUSTE DE INVENTARIO<0}
{0><}0{>Para que un usuario coloque artículos en una Requisición que deberá cumplirse, los artículos deben ser artículos de inventario (IV).<0} {0><}0{>Si un artículo colocado en una requisición no es un artículo IV, el proceso de planificación para esa requisición creará el artículo como un nuevo artículo IV.<0} {0><}0{>La forma más fácil para que un usuario de requisición guarde y mantenga una lista de artículos IV que se utilizarán en una requisición es una hacerlo en una “Guía de orden para usuario de requisición”<0}


{0><}0{>Para que un artículo sea agregado a una Guía de orden para usuario de requisición, debe ser un artículo IV existente en una GO IV.<0} {0><}0{>Vea los pasos 1.3.1 para obtener detalles sobre cómo agregar artículos a una GO IV.<0}
{0><}100{>Nota:<0} {0><}0{>Según la configuración de su propiedad, podrá utilizar o no el impuesto y el flete para calcular los costos de inventario para la salida.<0}
![]()

{0><}0{>La característica Planear compras es la más importante del módulo Inventario Birch Street.<0} {0><}0{>Planear compras permite la generación órdenes de compra a partir de los datos de requisiciones agregadas, y a partir de la información sobre la cantidad existente y el envío en ruta.<0} {0><}0{>La planificación de compras debe realizarse por SEPARADO en cada depósito.<0}
{0><}100{>Nota:<0} {0><}0{>Para planificar las compras, usted debe tener acceso de seguridad.<0}
{0><}0{>Los usuarios de compras pueden planificar
compras con cualquiera de los 6 métodos diferentes para Planear compras:<0}
{0><}0{>* Por salida
* Por proveedor
* Por salida y proveedor
* Todos los artículos de este depósito en base a cantidades iguales
* Todos los artículos de requisición no planeados de este almacén
* Todos los artículos de requisición no planeados de este almacén para un determinado
rango de Fecha de entrega
NOTA:<0} {0><}0{>Si hay un artículo que no está
en una Guía de orden de inventario y se crea una requisición de Depósito a
partir de una Búsqueda de producto o artículo sin catálogo, el nuevo artículo se
colocará automáticamente en la primera Guía de orden de inventario asociada con
el depósito definido cuando se ejecute Planear compras.<0}
{0><}0{>Proveedor elegido/de catálogo<0}
{0><}0{>Proveedor sobre la marcha<0}
{0><}0{>Planear compras para todos los artículos en un depósito basándose en reponer hasta la cantidad “reordenada”.<0} {0><}100{>NOTA:<0} {0><}0{>La cantidad reordenada se define en la ficha Guía de orden cuando se carga una Guía de orden de inventario y se selecciona la casilla Mostrar inventario.<0}


{0><}0{>Esto se logra mediante el vínculo Editar línea en la vista de impresión de la requisición.<0} {0><}0{>Puede suceder que un artículo esté marcado como ‘Planeado’ por error.<0} {0><}0{>Siga los siguientes pasos para quitar la planificación de un artículo.<0} {0><}100{>Nota:<0} {0><}78{>PPpPara quitar la planificación de un artículo, debe tener acceso de seguridad.<0}

{0><}0{>Se pueden agregar artículos de registro de proveedores al inventario (Sección 1.3.1).<0} {0><}0{>Estos artículos pueden colocarse en una requisición en el proceso normal de planificación de una compra.<0} {0><}0{>Debido a la naturaleza del registro, NO se puede colocar estos artículos en una Orden de compra en Birch Street.<0} {0><}0{>La compra inicial debe realizarse en el sitio Registro y luego el sistema de registro del proveedor transmite la orden de compra nuevamente a Birch Street.<0} {0><}0{>Siga los siguientes procedimientos para convertir una Orden de compra de registro estándar en una Orden de compra de registro de depósito.<0}

 {0><}0{>Las requisiciones pueden
completarse en cualquier momento luego de que los artículos en la requisición
se configuren como planificados.<0} {0><}0{>No es necesario que los
artículos tengan un balance existente positivo para ser completados, ya que los
balances de inventario pueden ser negativos.<0}
{0><}0{>Las requisiciones pueden
completarse en cualquier momento luego de que los artículos en la requisición
se configuren como planificados.<0} {0><}0{>No es necesario que los
artículos tengan un balance existente positivo para ser completados, ya que los
balances de inventario pueden ser negativos.<0}
{0><}100{>NOTA:<0} {0><}0{>Las
cantidades existentes de los artículos aumentan cuando el artículo se marca
como recibido durante el proceso de recepción.<0} {0><}0{>Para que el proceso
de cumplimiento utilice la información de costo actualizada, los artículos
deben recibirse en el sistema antes del cumplimiento.<0}

{0><}100{>Nota:<0} {0><}0{>El cumplimiento de un artículo
sustituto y el artículo original debe realizarse en dos eventos de cumplimiento
diferentes, dado que el campo Completar cantidad se utiliza para ambos
artículos.<0}
{0><}0{>Las transferencias de inventario pueden procesarse desde y hacia un Depósito y Salida en la propiedad.<0} {0><}0{>Las transferencias pueden hacerse de depósito a depósito, de salida a salida, de depósito a salida o de salida a depósito.<0}
{0><}100{>Nota:<0} {0><}0{>Para acceder a la función transferencia de inventario, debe tener acceso de seguridad.<0}
{0><}0{>Todas las transferencias que incluyen una salida (tanto HACIA como DESDE) generarán una transacción presupuestaria que cargará o invertirá de manera efectiva el cargo asociado con la transferencia hacia o desde la salida.<0} {0><}0{>Si está transfiriendo HACIA un depósito y el artículo NO existe en dicho depósito, entonces la aplicación creará el artículo en el depósito de destino automáticamente.<0}
{0><}0{>La pantalla ajuste de inventario brinda acceso a usuarios selectos para poder ingresar transacciones de inventario y ajustar la cantidad de un artículo o el último precio de un artículo (se usa para valuaciones de inventario).<0} {0><}0{>La mayoría de las transacciones de inventario se crean utilizando funciones normales: recepción, transferencias de inventario, cumplimiento de requisición, inventario físico, etc. La pantalla Ajuste de inventario está diseñada para realizar ajustes que no pertenecen al campo de estas transacciones.<0} {0><}0{>Los ajustes deben hacerse por artículo.<0}
-
{0><}0{>Ingrese a la pantalla Ajuste de inventario desde el menú Principal.<0} {0><}0{>En la Primera página, deseleccione la casilla de verificación Ocultar menú y seleccione Comercio -> Inventario – Ajustes de inventario<0} {0><}80{>Para acceder a pantalla de entrada Ajuste de inventario, debe tener acceso de seguridad.<0}
-
{0><}0{>Para crear una nueva transacción de inventario, haga clic en el botón Nuevo, ingrese los datos solicitados y haga clic en Guardar.<0} {0><}100{>NOTA:<0} {0><}0{>La pantalla Ajuste de inventario muestra muchas transacciones de inventario generadas por el sistema en la Lista de desplazamiento.<0}

-
{0><}0{>El campo “Ajustar cantidad disponible por” agregará o restará esta cantidad a la cantidad existente, como se muestra en la ficha de la primera página de Guía de orden.<0} {0><}100{>Nota:<0} {0><}0{>La cantidad en el campo “Ajustar cantidad disponible por” no reemplaza la cantidad existente sino que es la diferencia entre la cantidad actual y la que debería haber.<0}
-
{0><}0{>“Costo de la factura” reemplaza el costo de la factura generado por el sistema según se muestra en la ficha Guía de orden.<0}
{0><}100{>Llevar inventario<0}
{0><}0{>La función Llevar inventario permite
llevar el conteo del inventario físico y debe utilizase en el momento en que se
debe poner en espera el procesamiento de una transacción.<0} {0><}0{>Las transacciones de inventario,
hacia y desde el depósito en cuestión, no pueden ser procesadas mientras se
lleva el inventario.<0} {0><}100{>Nota:<0} {0><}70{>Para acceder a la función Llevar inventario, Importar
inventario, Cancelar inventario, debe tener acceso de seguridad.<0}
-
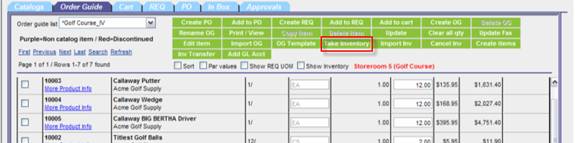
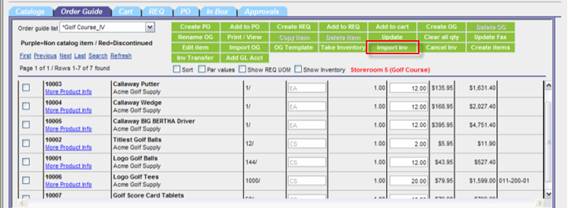
{0><}73{>En la ficha Guía de orden, haga clic en el botón Llevar inventario.<0}
-
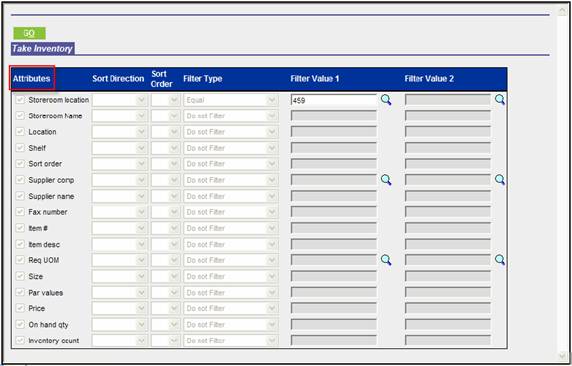
{0><}72{>Aparece la ventana emergente Llevar inventario. <0} {0><}0{>Acérquese e ingrese el Número de ID de depósito y haga clic en IR.<0} {0><}0{>Si el usuario conoce el Nº de ID de este depósito, puede escribirlo en el Valor de filtro 1.<0}
{0><}100{>NOTA:<0} {0><}0{>Al llevar el inventario de un depósito, una vez que descarga la plantilla Llevar inventario, no se podrán procesar las siguientes actividades para ese depósito:<0} {0><}0{>Planificar compras, Cumplimiento de requisición, Recepción, Transferencias de inventario (tanto “desde” como “hacia”) hasta 15 minutos después de que se procese la carga de Llevar inventario en el sistema O hasta hacer clic en el botón "Cancelar inventario".<0}
-
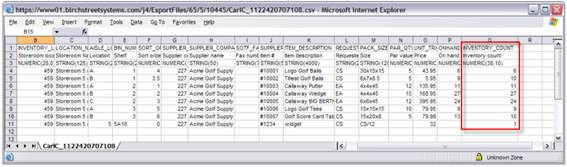
{0><}0{>Se mostrará la siguiente plantilla de un archivo .csv de Excel.<0} {0><}0{>Ingrese la información del conteo de inventario real en la última columna a la derecha y guarde el archivo como .tipo de archivo csv para que sea cargado.<0} {0><}0{>Cualquier desviación de la cantidad existente de un artículo creará una transacción de Ajuste de inventario en el sistema y ajustará la cantidad existente de ese artículo como mayor o menor.<0}
-
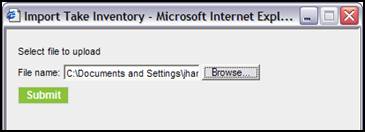
{0><}0{>Para cargar el Conteo del inventario físico, vaya a la ficha Guía de orden y haga clic en el botón Importar inventario.<0}
-
{0><}0{>Examine y seleccione el archivo .csv guardado en el paso 3.3, cargue el archivo y haga clic en Enviar.<0}
-
{0><}0{>El depósito no estará disponible para ser procesado hasta 15 minutos después de que se procese la carga Llevar inventario en el sistema.<0}
-
{0><}0{>Para cancelar el Conteo de inventario físico en proceso, haga clic en el botón Cancelar inventario en la ficha GO.<0} {0><}0{>Se esta manera se detendrá el proceso del inventario físico y dejará el depósito disponible para que sea procesado.<0} {0><}0{>Si selecciona el botón Cancelar inventario luego de la carga del conteo físico pero antes de que finalice el procesamiento final para gestionar el ajuste de inventario, se ignorará el conteo físico cargado.<0}
{0><}100{>Informes<0}